
1. Power the sensor
Connect the sensor to a 5 V supply using a good USB-C cable. Allow a few minutes for its first start.
2. Connect to its Wi-Fi access point
In your phone or computer's Wi-Fi list, look for Senhus SG-1C or Senhus SG-1S, matching the model you purchased. These names come from the published SG-1C firmware and SG-1S firmware. Older firmware may use a different name; check the label or contact Senhus if needed.
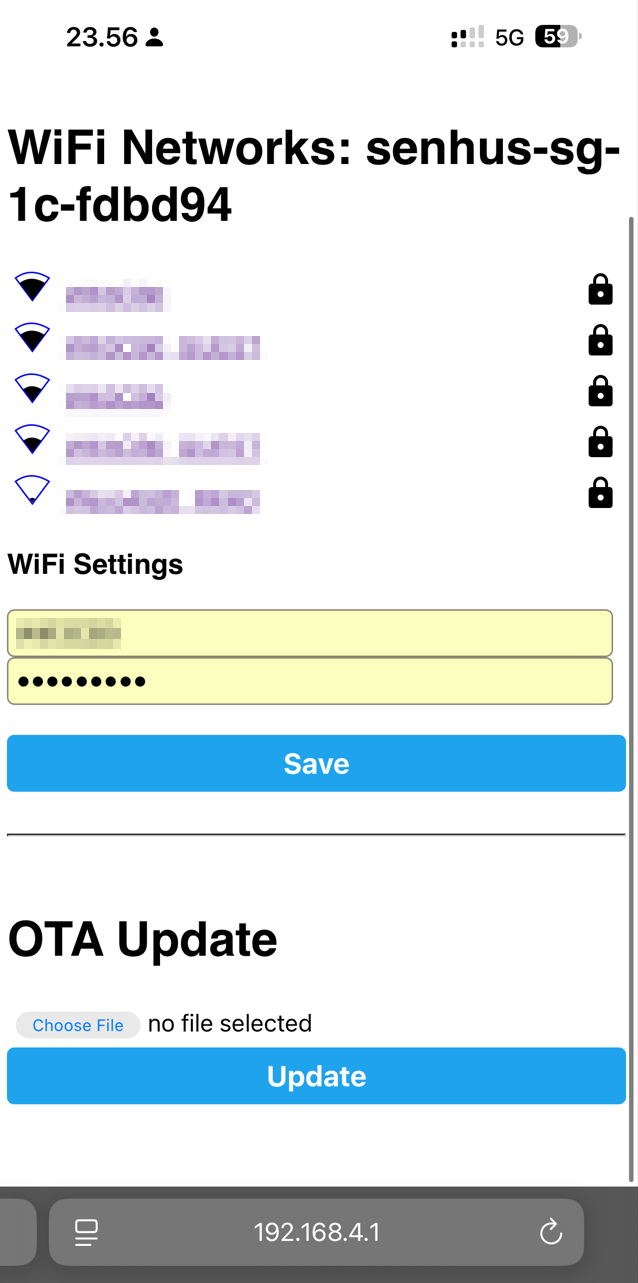
Join the device's network. If its setup page does not open automatically, open http://192.168.4.1 while connected to that network.
Select your home Wi-Fi network and enter its password. Enter the SSID manually if it is not listed. Allow the device to restart and reconnect your phone to your home network.
3. Add the sensor to Home Assistant
- Open Settings → Devices & services in Home Assistant.
- If the sensor appears under discovered ESPHome devices, select Add or Configure and follow the prompts.
- Assign the sensor to the appropriate area.
- If discovery does not find it, select Add integration → ESPHome and enter the device's local IP address or hostname. Your router's client list can help you find it.
- Supply an API encryption key only if your installed firmware uses one and Home Assistant asks for it.
The ESPHome Device Builder add-on is not required to use an already configured sensor. See the official Home Assistant ESPHome guide for current setup details.
4. Check detection
Open the new device in Home Assistant and watch Occupancy or Movement while walking into and out of the room. Next, check it while seated. Follow Sensor placement and Configuration to tune detection.
%20and%20%5BSG-1S%20firmware%5D(https%3A%2F%2Fgithub.com%2Fsenhus%2FESP32_Projects%2Fblob%2Fmain%2FSG-1%2Fs3-variant.yaml).%20Older%20firmware%20may%20use%20a%20different%20name%3B%20check%20the%20label%20or%20contact%20Senhus%20if%20needed.%0A%0AJoin%20the%20device's%20network.%20If%20its%20setup%20page%20does%20not%20open%20automatically%2C%20open%20%5Bhttp%3A%2F%2F192.168.4.1%5D(http%3A%2F%2F192.168.4.1)%20while%20connected%20to%20that%20network.%0A%0ASelect%20your%20home%20Wi-Fi%20network%20and%20enter%20its%20password.%20Enter%20the%20SSID%20manually%20if%20it%20is%20not%20listed.%20Allow%20the%20device%20to%20restart%20and%20reconnect%20your%20phone%20to%20your%20home%20network.%0A%0A!%5BWi-Fi%20configuration%20screen%5D(%2Fdocs-assets%2Fwifi-config-2.png)%0A%0A%23%23%203.%20Add%20the%20sensor%20to%20Home%20Assistant%0A%0A1.%20Open%20**Settings%20%E2%86%92%20Devices%20%26%20services**%20in%20Home%20Assistant.%0A2.%20If%20the%20sensor%20appears%20under%20discovered%20ESPHome%20devices%2C%20select%20**Add**%20or%20**Configure**%20and%20follow%20the%20prompts.%0A3.%20Assign%20the%20sensor%20to%20the%20appropriate%20area.%0A4.%20If%20discovery%20does%20not%20find%20it%2C%20select%20**Add%20integration%20%E2%86%92%20ESPHome**%20and%20enter%20the%20device's%20local%20IP%20address%20or%20hostname.%20Your%20router's%20client%20list%20can%20help%20you%20find%20it.%0A5.%20Supply%20an%20API%20encryption%20key%20only%20if%20your%20installed%20firmware%20uses%20one%20and%20Home%20Assistant%20asks%20for%20it.%0A%0AThe%20ESPHome%20Device%20Builder%20add-on%20is%20not%20required%20to%20use%20an%20already%20configured%20sensor.%20See%20the%20%5Bofficial%20Home%20Assistant%20ESPHome%20guide%5D(https%3A%2F%2Fwww.home-assistant.io%2Fintegrations%2Fesphome%2F)%20for%20current%20setup%20details.%0A%0A%23%23%204.%20Check%20detection%0A%0AOpen%20the%20new%20device%20in%20Home%20Assistant%20and%20watch%20**Occupancy%20or%20Movement**%20while%20walking%20into%20and%20out%20of%20the%20room.%20Next%2C%20check%20it%20while%20seated.%20Follow%20%5BSensor%20placement%5D(%2Fdocs%2Fdetect%2Fsensor-placement%2F)%20and%20%5BConfiguration%5D(%2Fdocs%2Fdetect%2Fconfiguration%2F)%20to%20tune%20detection.%0A)